Theatre Pipe Organs And Me

Wurlitzer 235 Opus 493 1921 Console Virtual Theatre Pipe Organ

Constructing My Virtual Theatre Pipe Organ

Wurlitzer 235 3/11 Opus 493
Hope - Jones Unit Orchestra
History and Restoration

Wurlitzer 235 Opus 493 Console Coming to Temora, NSW Australia

Wurlitzer 235 Opus 493 Reassembly and Installation

First thing was to inspect all the power supplies. The two Iota 12v 55 amp DSL-55 have to be replaced with 240v equivalents. Fortunately Iota make the DSL-240-55 which I have previously imported from the US ready for when the organ arrived. The two Chinese 5V power supplies were 110v/240v so did not need to be replaced.

That left the Organ Supply Industry 5005 AC Console Control System that manages the switching of the console. It provides 4 switched and 4 un-switched 110 VAC outlets as well as 12 volt DC outlets for control and general purpose use. Can be activated locally with a switch contact located on the organ console or remotely with 12 volts.

I didn't know what to expect with this and had hoped that I would be able to convert it to 240v. First job was to pull it out and open it to see what was inside. I was greeted with good news as the 12v power supply was 110v/240v compatible. The second was to remove the top board to find out how the 110v switching was being done. As luck would have it in place was a Crydom 110v 25 A Solid State Relay. A quick search on the internet revealed Crydom made a 240v 50 amp equivalent so was quickly ordered.

Next was to rip out any 110v lighting and replace it with 240v. Fortunately the console tab lighting was 12v LED so it was only the pedal lighting and a florescent lighting  for service work in the rear or the organ. I then placed LED coloured lighting system for the pedals and an LED service light into the rear of the cabinet.

thumb thumb thumb thumb

Two Iota DSL-55 - Two Chinese 5v - One Organ Supply Industry 5005

Organ Supply Industry 5005 AC Console Control System

Organ Supply Industry 5005 110/240 12v power supply

Crydom 110v 25 A Solid State Relay

 
Before I received the organ Joel had warned me that some of the cabinet wood joints were letting go and that the wood had split where the hinges that supported the top console were screwed into when hinged into the up position. She was starting to show her grand old age (100yrs). Also the lacquer they used 100 yrs ago on the base of the organ never actually dried and leached into the carpet leaving a stain.
thumb thumb thumb thumb

 Gluing all the joints where the old glue had let go

Gluing completed. These hinge points were badly cracked through the screw holes on both sides.

Sealing the old lacquer to prevent leaching into the carpet.
Before and after photos.

Finally the day arrived to bring the two halves together 17/04/22.

 
I tested the Organ Supply Industry 5005 AC Console Control System before refitting it to the organ. For the first power on test I unplugged all the fuses to the electronics.

All power supplies have a voltage readout LED and all measured correctly when switched on.

Lighting system was tested next then the fuses replaced, all boards in the organ had their activity LEDs flashing correctly.

thumb thumb thumb thumb

Correct readout of power supplies

LED light test

LED light test

LED light test

 
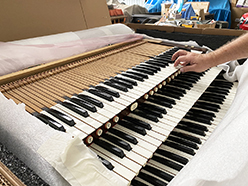
The keyboards when unpacked were in need of some work. They didn't have the correct depth of movement being quite shallow and were in need of levelling. The second touch on the Great was found to have extra screws in place attached to the 2nd touch springs making them almost imposable to use. The Accompaniment keyboard was much better having no extra screws but still was quite shallow. All the #'s / b's on all manuals were set too high.

Because the keys were set so low, the key springs have all been squashed out of shape and the Great 2nd touch springs have been deformed so new springs will be needed to be ordered and replace the old springs. For now all the springs have been removed and bent back into shape and put back in as a temporary measure until new springs arrive.

All keyboards will now have the correct travel and depth between white and black keys and when they rest on the 2 touch springs still remain correct depths all with the same 2nd touch movement. Specification information on how to set up Wurlitzer keyboards was hard to find as internet searches revelled nothing. My friend Bob from Arndt Organ Supply Co was kind enough to share the exact measurements for 1st touch, 2nd touch and Solo keyboards.

One day in the future all the key bushings will need to redone, they look like they could be original so there is sideways movement and wear.

thumb thumb thumb thumb

Keyboards out of the box

Special tool made to remove and replace springs easier

Deformed key spring.
This one not as bad as others

Silver screws removed and not used originally, made it impossible to use 2nd touch and deformed the springs

thumb thumb thumb thumb

Setting Key Depth

Setting Key Depth

Levelling the keys

Key Parts. New stem will have to be made from 2mm brass rod.

thumb thumb thumb thumb
Lower manual completed Lower manual completed Solo manual completed Brass plate lacquer has gone off and will need sanding and re-lacquering
 

<<<<<Top >>>>>